Google form is an awesome service provided by Google. This service
allows registered Google users to collect data from their web visitors. It’s
just the same way you will use HTML form tag to ask your visitors for
information for processing.
Well, we can all rely on this free service Google provides
to us to create a nice user feedback form to request feedback from your
visitors. Some advantages you enjoy are they free to create and you can also
receive unlimited responses from your visitors. Besides that, the app also has
an interactive dashboard which allows you to view all responses or view them
individually.
I have created this post to give a basic tutorial on how you
turn Google form into a feedback tool for your website for free. Now let’s get
started
How To Turn Google Forms Into A Nice Feedback Tool
1. To access Google app go to https://www.google.com/forms/about/
2. After you have visited Google forms, the next thing to do
is to sign in with your Google account or if you do not have a Google account
you can sign up for free.
3. Now that you’ve logged in its time to start building the
form.
This is how your Google form page should look for the first
time.
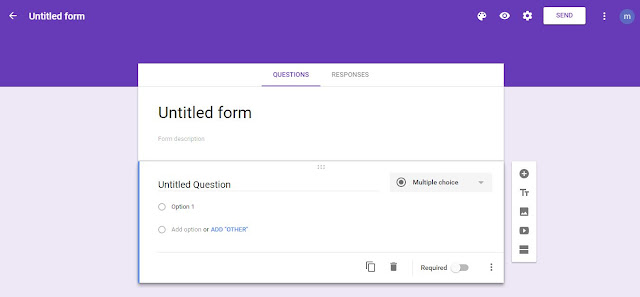
4. Now to create your feedback form click on blank and your
page should look like the image below
Before we begin I want to explain a few buttons you need to
know
These button can be located at the top right corner of the
page and each button has a function.
i. The first button allows you to select a color palate for
the form.
ii. The second button allows you to preview the final looks
of the form as you build.
iii. The next button is the settings button which gives a
lot options to control how your form should be. Clicking on the settings button
opens a dialog box which has number controls to allow you to set number of
response a visitor can submit, text to be display on the confirmation page,
allow users to submit another response, edit their response, see a summary of
their responses, display a progress bar or shuffle the questions.
iv. The send button allows you to publish your finished form
to Facebook, Google Plus or Twitter. You also have the options to send it via
email, embedding it on your websites or sharing it via link.
These vertical control button can be found sitting beside
your forms. Each button has got useful roles to play.
The first button allows you add another question to the form.
The next button allows you to add a title and description to
the form.
You can use the third and fourth buttons to add images and
videos to the form.
And the final button allows you to group your form into
sections.
Now let’s create our first form.
1. Click on the untitled form title to give your form a nice
title heading.
2. You can also add a form description by clicking on the
form description.
3. To type your first question click on Question to add the
question you want to add.
4. Next thing to do is to create the answers to the
questions. The first option you’ve got is the multiple choice, so click on
option 1 and then type your first answer, to add other answer click on add
option and then type the answer you want to display. As I wrote earlier you
have different ways to allow your visitors to answer the questions. You can
choose to make your visitors write a short answer or paragraph, display answers
as check boxes, drop down menu and a few others.
5. If you want to your visitors answer a compulsory question
you can turn on the required on by sliding it to the left. You can also
duplicate or delete a question using the buttons beside the required option.
Viewing your responses.
At the top of the form you can see two tabs, the questions
tab and the responses tab. To view your responses just click on the responses
tab to view all responses submitted or you can choose to view your responses
individually.
Conclusion
I hope you can take full advantage of Google form to create
a stunning online feedback for your websites. Doing so can help you monitor
what visitors like and hate about your various webpages. I hate to say this but
I’m done with the tutorial.
I’m out.


1 comments:
Thank you for the nice article here. Really nice and keep update to explore more gaming tips and ideas.
ReplyMobile App Development Company in Noida
Post a Comment